目前在開發環境中,自動化整合與佈署已經是不可或缺的工作,而Gitlab有提供了自動化整合,讓程式碼異動commit進repo時能自動執行啟動,然後gitlab-runner會把能夠執行的job抓下來執行並把結果回傳到gitlab,來達到自動化測試與自動化佈署
install gitlab-runner
在安裝gitlab-runner 環境,因為是需要使用個人帳號執行 pod install 並且需要自動登入,否則會遇到 “gitlab-runner is not running“的問題,所以建議是先在Mac環境中建立獨立的帳號,以下先安裝homebrew 套件,再使用homebrew 安裝gitlab-runner
$ /usr/bin/ruby -e "$(curl -fsSL https://raw.githubusercontent.com/Homebrew/install/master/install)"
$ brew install gitlab-runner
$ brew services start gitlab-runner
建立gitlab-runner 資料夾
$ mkdir ~/gitlab_runner
$ cd ~/gitlab_runner
Register gitlab-runner
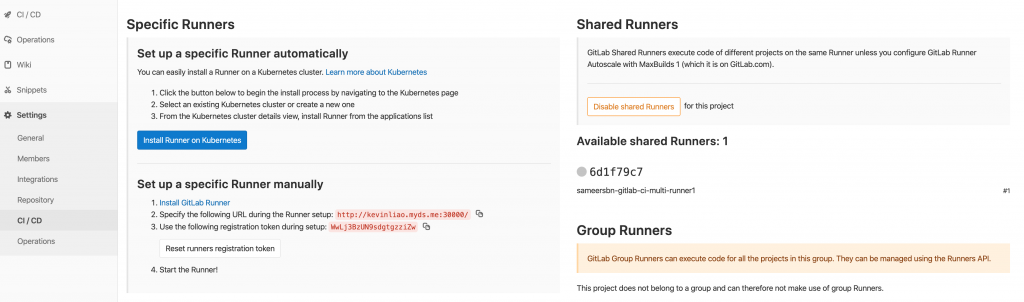
在註冊gitlab-runner 之前需要先跟gitlab 取得hostname 與token
在Project 的setting 中有個CI/CD , 再打開runners 的設定後,可以取得hostname 和token
$ gitlab-runner register
Runtime platform                                    arch=amd64 os=darwin pid=36852 revision=003fe500 version=12.7.1
WARNING: Running in user-mode.
WARNING: Use sudo for system-mode:
WARNING: $ sudo gitlab-runner...

Please enter the gitlab-ci coordinator URL (e.g. https://gitlab.com/):
http://kevinliao.myds.me:30000/
Please enter the gitlab-ci token for this runner:
WwLj3BzUN9sdgtgzziZw
Please enter the gitlab-ci description for this runner:
[Chienyus-iMac.local]: ios-runner
Please enter the gitlab-ci tags for this runner (comma separated):
ios,android,react-native
Registering runner... succeeded                     runner=WwLj3BzU
Please enter the executor: docker-ssh, shell, ssh, virtualbox, docker+machine, docker-ssh+machine, custom, parallels, kubernetes, docker:
shell
Runner registered successfully. Feel free to start it, but if it's running already the config should be automatically reloaded!
這裡有個很重要的一點,就是不能使用sudo 去跑system-mode 因為pod install 要求使用user-mode , 如果使用system-mode 會報錯而無法執行。
所以 Gitlab-runner for Mac 不能使用ssh 進行操作 要用 terminal GUI
- Please enter the gitlab-ci description for this runner 輸入runner 的名稱
- Please enter the gitlab-ci tags for this runner (comma separated) 輸入runner 的tag 後續可以在yml 檔中使用tag讓特定的runner來執行
- Please enter the executor: docker-ssh, shell, ssh, virtualbox, docker+machine, docker-ssh+machine, custom, parallels, kubernetes, docker 因為我們這裡使用shell 來執行
Registering runer … succeeded 後可以看到gitlab-runner 已經成功,如果不能可以使用以下指令檢查gitlab-runner 狀態
$ gitlab-runner install //自動執行gitlab-runner service
$ gitlab-runner staus  // 目前運作狀態
$ gitlab-runner status gitlab-runner list //列出所有的runner
$ gitlab-runner verify --delete //重新驗證所有的runner,並移除無法使用的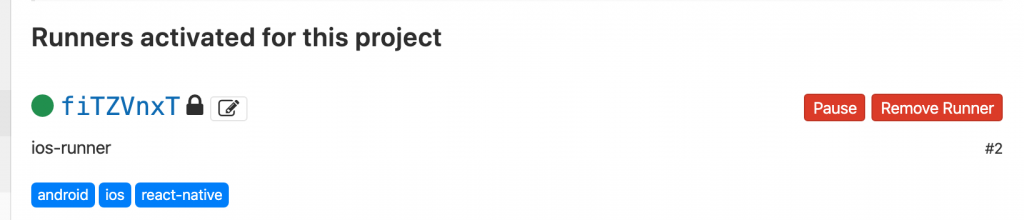
專案加入.gitlab-ci.yml 檔案
stages:
  - test

variables:
  LC_ALL: "en_US.UTF-8"

before_script:
- pod install

test:
 stage: test
 script:
    - xcodebuild clean build -workspace helloCI.xcworkspace -scheme helloCI -allowProvisioningUpdates
    - xcodebuild test -workspace helloCI.xcworkspace -scheme helloCI -destination 'platform=iOS Simulator,name=iPhone 11,OS=13.3' | xcpretty -s
 tags:
  - ios